
+- Stuntride (https://stuntride.the-nags.com)
+-- Forum: Stunt Discussion (https://stuntride.the-nags.com/forumdisplay.php?fid=4)
+--- Forum: Help and How To (https://stuntride.the-nags.com/forumdisplay.php?fid=12)
+--- Thread: Stuntride motorcycle Stunt bike set up (for beginners) (/showthread.php?tid=5448)
Stuntride motorcycle Stunt bike set up (for beginners) - Juca - 09-09-2010
F4i CLUTCH MOD :
Grind out the rivet that holds the swivel/cable connector on the end of the stock arm and drill one more hole about half way down the arm.
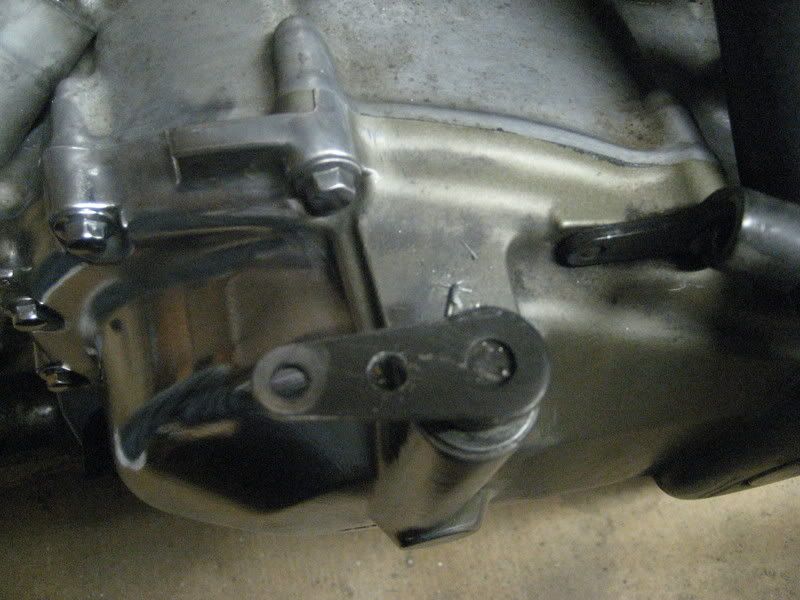
Get a piece of flat steel and cut it to size... I did about 5/8 - 3/4 extra length.
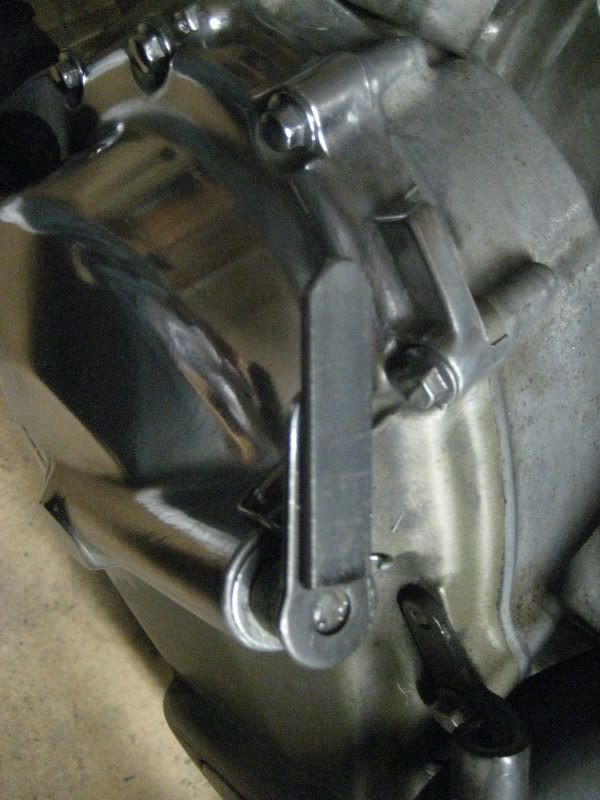
Mark and drill out the two matching holes to bolt up to the arm. Then a 3rd hole on the end for the cable connector.
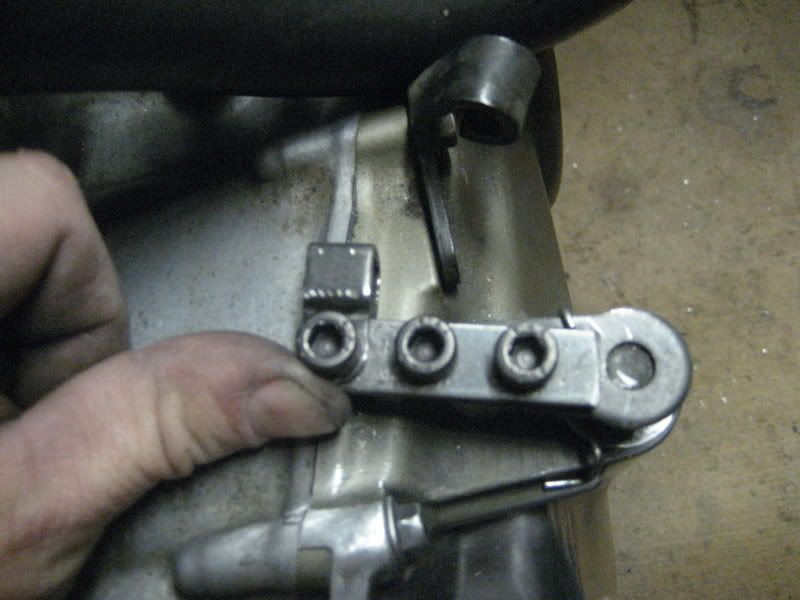
I used 6mm grade 12.9 bolts and made the holes just a tad small so the bolts actually screwed them selves into the arm... the nut on the bottom is just for safe measure.

Stuntride motorcycle Stunt bike set up (for beginners) - Juca - 09-09-2010
NAARDEN STORE :
All what you need you can find here.

Also you can pm him here on the forum : (Just click)
Stuntride motorcycle Stunt bike set up (for beginners) - Juca - 12-12-2010
ON POINT :
On-Point has come out with a new line of stunt parts featuring a revolution in stunt cage technology. Utilizing a cantilever shock absorption system developed by Formula 1 cars and a boxed plating design used in off-road trophy trucks, this cage provides the ultimate in protection while maintaining a lightweight streamline design. Extensive thought went into designing a cage that protects the frame, tank, handle bars, and fairings, while not impeding the nimbleness and aggressive leaning of the bike during drifting.
- Made of 1/8” 4130 aircraft quality chromoly plating and chromoly tubing cross-bar for ultimate strength and weight savings.
- CNC machined for extreme precision.
- Tig Welded
- Grade 8 mounting hardware included
- Powder coated gloss black
- Extensive R&D on cantilever dimensions and spring rate to find optimal shock absorption
- Solid aluminum sliders which are strong enough to withstand repeated hard impacts without bending or breaking, unlike competitors plastic sliders, yet provide the give necessary to prevent catching the pavement and therefore flipping the bike.
- Plated/Boxed design with inner braces provides the ultimate strength while staying lightweight. Tubing is great, but cannot compare with this fabrication technique which is utilized in trophy truck control arms and trailing arms which take repeated high impact abuse.
- Stays clear of banging your shins.
- Easy to install and remove for bike maintenance. Detailed instructions included.
Stunt Cage Stage 2 - Current promotional price: $399, Regularly $475
Stunt Cage Stage 1 (same as Stage 2 without the cantilever shock absorption system - Current promotional price: $299, Regularly $375
Street Cage - Current promotional price: $150, Regularly $175
Sub Cage - Current promotional price: $175, Regularly $199
Flat 12 Bar - Current promotional price: $99, Regularly $125
Round 12 Bar - Current promotional price: $99, Regularly $125
Tail Saver - Current promotional price: $75, Regularly $99
All Parts in stock and ship within 24hrs of placing order
Free shipping, Free T-shirt, and $25 rebate if you post a write up with pics of the cage on your bike.
Visit www.onpointperformance.com for more products, pics, and details.
Thank you
Stuntride motorcycle Stunt bike set up (for beginners) - Juca - 12-12-2010
SMD FRAMES :
We've been working on a new frame design that fits in the "freestyle budget".
These new frames use the rear section of the stock frame.
The kit comes with an aluminum insert that welds in to the stock frame (which must be cut in half). The SMD steal tubular frame then bolts into the modified stock frame.
Cost: $1000


Stuntride motorcycle Stunt bike set up (for beginners) - Juca - 12-12-2010
RSC :
That's right!! These are the LE Christmas RSCs! The Christmas RSC comes built w/ a Delrin bushing, but I'm throwing in a free bearing on the side, so Christmas morning can be a guaranteed winner! Only available in shorties.....and only these 4 available!!
The Christmas edition RSC is $100 shipped w/ in the US, and $105 shipped internationaly. They are only avail. here on SR, and you must contact me via PM to see how many are left!


Stuntride motorcycle Stunt bike set up (for beginners) - Juca - 12-12-2010
Sick 09 ZX6 Parts:
Subcage will be posted in a few days.


Stuntride motorcycle Stunt bike set up (for beginners) - Juca - 12-12-2010
MOTO MADNESS :
We now have some Viper Shorty exhaust cans available. They have a 2" inlet pipe and sound awesome to.
20cm Micro Viper Slip On Exhaust Can
�3lbs 3oz
�14" overall lengh
�9.5" long x 5" high x 3.75" wide
http://moto-madness.com/catalog/inde...&cPath=412_718


Stuntride motorcycle Stunt bike set up (for beginners) - Juca - 12-12-2010
Hi guys,My buddy makes exhaust cans for motorcycles and I thought you might be interested. I was rocking one on my F4i for 2 years, and now I've just got new for kawi.
All I can say is "TOP QUALITY WORK" Cans have awesome finish as on the pics. They build good back pressure and sound great. I can make some vid next weekend to show you how it sounds, and how the bike is running.
I tried to instal side fairing and it looks like the can is fairing-friendly I don't run FF so I don't know how it works for a long time. Maybe you should cut or grind your plastics a little, IDK.
I took some pics If you're interested - PM me for details! I don't know how much for shipping to US, but I will check it


This is how it was before:

And this is the NEW LOOK You can't see any welds

I also took a pic from the inside. This is why it builds good backpressure and is not so loud

Peice 200 $ + shipping
To contact use link from post or pm this guy
http://www.stuntride.com/vbstunt/pri...o=newpm&u=8006
Stuntride motorcycle Stunt bike set up (for beginners) - Juca - 12-15-2010
Truck Bed Coating (TANK)
Dented in tank and sprayed truck bed coating for grip. Thought it came out pretty good and may be of help to someone.
Step 1.
Denting in tank. I 1rst stood on tank and stomped on the rear of the gas cap 2-3 times. Where cap and tank meet. Then i used a big rubber mallet for the rest.
After that and still apart of step one is taping it off. I used fine line tape, masking tape, and a northern tool catalog. Garage was closed for the pic so poor lighting. For the gas cap I first removed it and taped around it and then remounted it.Just got done doing this. Dented in tank and sprayed truck bed coating for grip.
Step 2.
I used a 3" orbital sander to sand where the paint chipped. Starting with 120grit, 220, 320, & 400grit.
Be sure to move further out with each grit. After sanding you want it to be as smooth as possible, with no deviations between metal and paint.
After 120
Step 3.
Final before primer. After sanding with 400 grit I used a grey scuff pad went over evrything. Be sure to scuff near gas cap, where tape meets paint, and near plastic cover. Before primer be sure to go over area to be painted, with wax and grease remover.
Step 4.
Primer, I use self etch primer made by PPG.
Step 5.
Dupli-Color Truck Bed Coating. I bought it from Auto Zone. I applyed approximately 4-5 coats. Wait 5min. between each coat, the last coat I waited maybe 10-15min.
Wet truck bed coating.
Final Results
Over all very pleased. And the next day taking the tank off, gas leaked from the gas cap due to me not tightening the cap and the coating held up great!
Made by Marc
Stuntride motorcycle Stunt bike set up (for beginners) - Juca - 01-17-2011
Tank lip for dummies
for those of us that arent professional welders or body work guru and dont want to pay money for someone else to do your welding here is an easy way to put a lip on your tank. I took a 3/4 inch piece of conduit and braised it on my tank. for those of you that dont know what braising is its kinda like sauter except its a torch and obviously braising rod. once i braised it on i body puddied then paint and will get rewrapped monday here are some picks.


Made by Kirny