
+- Stuntride (https://stuntride.the-nags.com)
+-- Forum: Stunt Discussion (https://stuntride.the-nags.com/forumdisplay.php?fid=4)
+--- Forum: Help and How To (https://stuntride.the-nags.com/forumdisplay.php?fid=12)
+--- Thread: Stuntride motorcycle Stunt bike set up (for beginners) (/showthread.php?tid=5448)
Stuntride motorcycle Stunt bike set up (for beginners) - Juca - 06-04-2009
SICKINNOVATIONS r6 subframe :


Stuntride motorcycle Stunt bike set up (for beginners) - Juca - 06-04-2009
SICKINNOVATIONS "Granade Hell Guards":
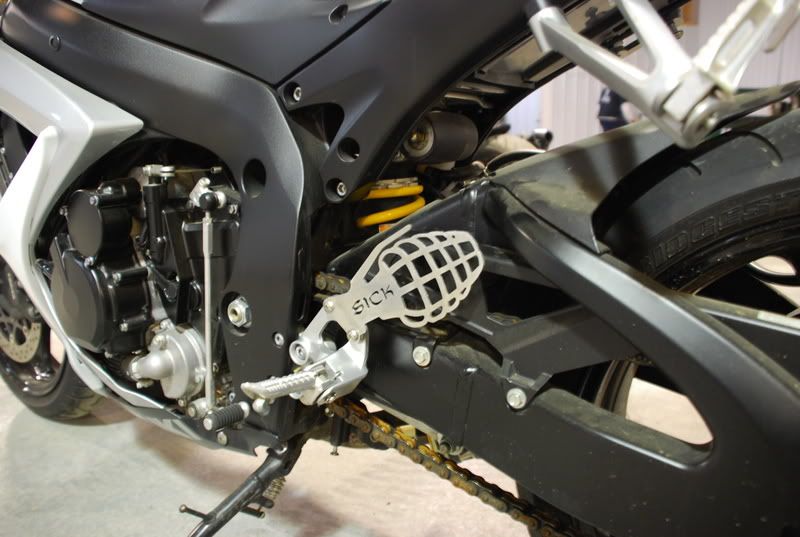
Stuntride motorcycle Stunt bike set up (for beginners) - Juca - 06-04-2009
IMPAKTECH f4i cage :


Cage price : 250 $ (Including Shipping)
CAGE WILL FIT JUST ON SF BIKE (STREET FIGHTER)
FOR MORE INFO ABOUT THIS CAGES CONTACT : SON DOOBY (click it)
Stuntride motorcycle Stunt bike set up (for beginners) - Juca - 06-04-2009
HOW TO POLISH ALUMINIUM :
You'll need:
* All-purpose metal polish
* 600- and 900-grit wet/dry sand:
* Oven cleaner
* Rubber gloves and eye protection
* A clean, soft rag
* Rotary tool with buffing bits (optional)
* Hand drill (optional)
(1) STRIP THE ANODIZING
To remove anodizing, I use spray-on oven cleaner, straight from the grocery store (I like no-fume Easy-Off the best). Follow the warnings on the can, work in a well-ventilated area and wear gloves and eye protection when you use oven cleaner; it's nasty stuff. Place the parts on newspaper or on a piece of cardboard to protect your shop's work area from overspray. Spray the oven cleaner onto the parts, covering them completely. Let them sit for a few minutes to allow the cleaner to do its job, then scrub them with soap and water to remove the oven cleaner. Repeat this process until all the anodizing is gone.
(2) SANDING
Your parts won't took so good at this point, but don't worry; we're about to fix that. Head to the automotive paint-supply store and grab some fine, 600- and 900-grit wet/dry sandpaper and use it to clean up the aluminum's surface before you add polishing compound. Parts such as bulkheads and suspension arms are a little more timeconsuming than round parts because they have lots of surfaces that need to be sanded, and everything must be sanded by hand. Round parts are a lot easier; place them in a drill, and sand the part while it's spinning (use a low-speed setting, and coat the sandpaper with oil to prevent it from becoming clogged) Completely sand the parts with 600-grit sandpaper until all the foreign matter has been removed from the surface, then switch ti 900-grit and repeat the process. You may have to wrap the sandpaper around a small stick or a wooden dowel to get into tight spaces. Finish by rubbing the part all over with fine steel wool.
(3) POLISHING
You might be happy with the way your parts look at this point, but don't get too excited yet; they're going to look even better. Now is
the time to do the final polishing with aluminum polish. I like Blue Magic metal polish creme, but any all-purpose metal polish will work well. For complex parts, use a rotary tool with buffing wheels of various sizes to polish the surfaces of the aluminum. I like to hand-apply the polish to the part with a damp rag before I use the buffing wheel so that I can apply the polish evenly. To prevent the polish from being dried by the heat generated by the friction between the buffing wheel and the aluminum, run the rotary tool at low speed. For the round parts, just leave the part In the drill chuck and apply the polish with a damp rag while It's turning. Be careful when you come close to the drill chuck; you don't want to get your fingers or the rag caught in the drill. When you've fin[shed the polishing, wash the part with soap and water to remove any
polishing-compound residue.
Now that wasn't so bad, was it? A brightly polished finish does take a little time, but it's time well spent. To preserve the bright took, you can maintain the finish with touch-ups of metal polish or seal the parts with spray-on clearcoat (check the spray-paint section at the hardware store). If you don't seal or maintain the polished finish, the bare aluminum will oxidize and become dull, but you can always buff it back to a shine again.
Stuntride motorcycle Stunt bike set up (for beginners) - Juca - 06-04-2009
HOW TO PREP AND PAINT YOUR BIKE :
PAINT AND PREP SUPPLIES :
Reducer
Plastic Filler
Flowable Putty
Epoxy Sealer
Epoxy Primer
Base color Paint
Clear Coat
80,120,400,600,1500,2000 grit wet/dry sandpaper
IMPROVISED PAINT BOOTH
If you're like me, you don't have the luxury of a down-draft spray booth in your shop. Here's what I did. I cleaned out a storage room that's attached to the back of my shop. I lined the walls with white poly, and placed a variable speed fan in the window. I then went around with a roll of duct tape and sealed the perimeter of the fan to the surrounding poly on the walls. Now onto the lights. After the first time you try painting something, you'll quickly learn just how critical good lighting is. In fact when it comes to lighting, the brighter your paint area the better. A buddy gave me two four-tube florescent light fixtures, which I hung on opposite sides of my new spray booth. It's good to have reflective walls. Lining the walls with white poly not only saves your walls, but it's also quite reflective.
SAFETY
Before I continue, I want to stress safety. It's a very bad I idea to paint in a room that's attached to your house. In fact, it may not be legal in some jurisdictions. Also, paint fumes are not only super toxic, they're highly flammable. Make sure your fixtures are wired properly, and that your fixtures are fully encased with lens covers attached. Last but not least, make sure you have a good quality respirator with the correct filters for the kind of paint you're using.
PAINT EQUIPMENT
For tools you'll need at least two spray guns, a air regulator with a water trap, a compressor, and of course some air hose. As aforementioned, you'll need 2 paint guns... one for painting primer, and another for painting base and clear coats.
PREP FOR PAINT
Be certain your fuel and oil tanks are pressure tested and leak free before you start. Ideally, it's good to sandblast your metal parts, especially if they have old paint on them. If you choose not to sandblast, make sure to sand them really thoroughly and wipe them down with a non oil-based cleaner prior to starting the job.
The next step is to apply filler to the low spots and any trouble areas. It's a matter of personal preference, but I like to spray a coat of epoxy primer prior to spraying on the base coat. This gives a nice base for the filler to adhere to. Prepare your filler in small amounts (it sets up fast) and apply it smoothly and evenly onto your part.
After the filler has dried, sand it smooth with 80 grit and look it over for any low spots or chips, then fill and sand again. After the necessary rounds of filler and sanding are finished, it's time to prime.
Spray on a couple of coats of epoxy primer. After the primer has dried, get a spray can of black paint and very lightly spray it over your part. This is the guide coat. The light black coat will show any ripples, low spots or defects in your handy work. To repair the problem areas that the guide coat exposed, you'll want to use flowable putty instead of filler. Apply the putty in thin even coats, then smooth it down with 80 grit sandpaper (wrapped around a rubber sanding block). Once you get the high spots leveled down, smooth it down even more with 120 grit, then finishing it with 400 grit. You're now ready for the last round of primer. Once the primer is dry, sand it thoroughly with 400 grit to give it a toothy surface for the base coat to stick to. I like to spray on a coat of epoxy sealer just prior to spraying the base colour coat. In addition to providing a ideal surface for applying the base color, it also prevents any solvents from coming through and causing bubbles in your clear coat. Make sure to follow the paint manufacturers spec sheets with regards to mixing times, mixing ratios and painting temperature. Failure to following the instructions will cause you much grief...believe me.
BASE COAT/CLEAR COAT
Now comes the color coat. Lay down the colour coats as per your paint manufacturer's spec sheet. Next comes the clear. After the first round of clear has dried, wet sand it down with 600 grit. You'll notice rows of ridges appear in the clear as you sand. Keep sanding until the clear is even and the ridges are gone. If you're painting graphics on, now is the time to put them on. After applying your graphics, cover them with another round of clear. It may take one or more rounds of clear to completely bury the graphics. Be sure to wet sand flat with 600 grit between rounds of clear. After the last round of clear has been sprayed, sand it down flat with 600 grit like before. When it's nice and smooth, finish it off with 1500 grit. If you want to get it even more silky smooth, go for a final round of 2000 grit.
POLISHING
Now for the gratifying part. The final step is to polish it to a mirror finish. You'll need a variable speed polisher, a buffing pad, and some polishing compound. There are many different kinds of buffing compound available. Your local automotive supply store will be able to recommend a good one.
Stuntride motorcycle Stunt bike set up (for beginners) - Juca - 06-04-2009
HOW TO REPACK AN EXHAUST :
You need :
Exhaust drill
Pop rivets (mine were 5.0 i think)
Pop rivet gun
Steel wool or fiber glass packing
Common sense and patience
Time : took me bout 30 mins but if its your first allow an hour.
Step (1)
Get your muffler off your bike

Step (2)
Drill out the rivets , work in a cross pattern and don't use a big drill bit
or else you will stuff the can

Step (3)
Pull off the end cap , it may need a little twist (be gentle ) . As you can see it wasn't too bad

Step (4)
Pull out the packing (or whats left) and throw it away make sure you keep the core . this is what you should have left (the can, core and end cap)

Step (5)
Grab your packing material and wrap it around the core make sure its not to tight but it will still fit back in to the can (this is what i used )

Step (6)
Put it all back into the can and make sure the core is in the correct spot , it should sit nicely into its grove at the bottom and make sure its centered

Step (7)
Place the end cap back on and line up the holes and pop rivet it back together using the biggest rivets that you can fit in the whole to ensure a good Finish
Step (8)
Place muffler back onto bike and make sure everything is good and tight then start it and listen to the sweet sound of a freshly packed exhaust
This is what i used to pack it with, 70 cents each :

DONE!
Stuntride motorcycle Stunt bike set up (for beginners) - Juca - 06-04-2009
STUNTEX OIL PICKUP :
These high quality CNC machined aluminum pickups greatly reduce engine problems due to oil starvation. This pickup has been designed to pickup oil from the rear of the oil pan instead of the front as the stock pickup does. This pickup prevents air from getting into the oil system (oil starvation) during wheelies and greatly improves oil pressure when on the bar and during wheelies (fast or slow) giving a smoother power delivery. This modification is intended for use in stuntbikes only.

Installation:
Remove your oil pan.
Take off your existing pickup.
Install the metal ring tab.
Put your pickup back on but spin it 180 degrees. Make sure you reuse your old seal, or get a new one.
Bend the tab to keep the pickup from turning.
Install the metal gasket ring. This creates a oil build up in the pan where the pickup is.
Put your oil pan back on and start scraping.
StuntersStore.com and Stunters.com. If you have any questions, feel free to email us at stuntersstore@yahoo.com
Stuntride motorcycle Stunt bike set up (for beginners) - Juca - 06-12-2009
HoHey Rearset :
Sturdy rearsets designed to be much improved over stock. Being stronger and more durable, these rearsets will stand up to the abuse you give them.
Price : 219,98 USD

Stuntride motorcycle Stunt bike set up (for beginners) - Juca - 06-12-2009
WOODCRAFT REARSETS :
It's widely known that even though the 636 is a great bike, the rearsets are a quite weak from the factory. Lucky woodcraft offers a basic rearset kit consisting of the rearset plates, footpegs and all of the needed hardware (shift rods, etc) to install the kit properly. These kits assume that you currently have the OEM rearsets on your bike, and utilize the OEM shift and brake pedals. They are made from tough, aircraft grade 6061 T6 Aluminum. They are much stronger than OEM brackets and will give your bike a look that will separate you from the crowd. Most kits are upgradeable at any time to accept the 3 piece billet shift and brake pedals.
Pegs adjustable to up 3/4" and back 1/2" for a more comfortable position.
Price : 199 USD

With Peddals :
It's widely known that even though the 636 is a great bike, the rearsets are a quite weak from the factory. Lucky woodcraft offers a rearset kit consisting of the rearset plates, footpegs pedals, and all of the needed hardware (shift rods, etc) to install the kit properly. They are made from tough, aircraft grade 6061 T6 Aluminum. They are much stronger than OEM brackets and will give your bike a look that will separate you from the crowd. Most kits are upgradeable at any time to accept the 3 piece billet shift and brake pedals.
Pegs adjustable to up 3/4" and back 1/2" for a more comfortable position.
Price : 329 USD

Stuntride motorcycle Stunt bike set up (for beginners) - Juca - 06-12-2009
FULL THROTTLE INC DCB :

03-04 636 :
INCLUDES 80 Brake Line, caliper bracket and crush washers
This kit is out of control. After being on the street for just a couple of weeks it's already got a reputation as the hot set up for precision rear brake control. This kit uses a right and left side 4 piston front brake caliper found on the 929's, the 954's the F4i's and F4's. You will have to source calipers (which are usually sold in pairs) as they don't come with the kit.
Why would you want to use a 4 piston caliper for your foot brake? Control and feed back at the lever. Face it, your stock rear caliper is sloppy. It slides on pins, so you have to press your foot pedal several inches just to take the slack out and get it to bite, then it's all about vaguely smashing the pedal until the bike starts to do what you want. A fixed position 4 piston caliper eliminates all of that. You actually get feed back at the pedal, a stiffer pedal and reduced effort. For those still chasing balance point this won't mean much, but for the rest of you it will mean more precise riding, making everything from no handed sit down wheelies and beyond more predictable and controllable. Riders also mention that they like not having to adjust their idle down during a run with this kit.
In case anyone brings it up, the bottom caliper is far enough inside the wheel that it can't possibly contact the ground in the event of a crash.
Don't forget, your pads overhang the rotor on this kit. This is an important issue, because the total thickness of the pad material on each side is greater than the thickness of the rotor. This means that if you run an unmodified stock pad, the pads will eventually touch together where they aren't contacting the rotor. When this happens, you have no handbrake. Your options are to either grind the pad away where it does not contact the rotor and breathe brake pad dust, or purchase our pre-machined pads. Leave the lung cancer to us, the pads are the same price you'd pay nearly anywhere for them and you have more usable surface area of the pad contacting the rotor than you would if you butcher them up yourself with a 5" grinder. Select the option below to have the Carbone Lorraine or stock Honda pre-machined pads shipped with your order.

This kit is in stock now and will ship immediately. Expect it on your door in 3-4 working days or less.
Price : 170 USD
http://www.fullthrottleinc.net/store/index.php