+- Stuntride (https://stuntride.the-nags.com)
+-- Forum: Stunt Discussion (https://stuntride.the-nags.com/forumdisplay.php?fid=4)
+--- Forum: Help and How To (https://stuntride.the-nags.com/forumdisplay.php?fid=12)
+--- Thread: Stunt bike set up (for beginners) (/showthread.php?tid=4036)
Pages:
1
2
Stunt bike set up (for beginners) - Juca - 01-17-2009
1. SICKINNOVATIONS
CRASH CAGES :
PRICES :
HONDA :
Honda 929 Cage : 219.99 USD
03-06 Honda 600RR Cage : SAME
2007 Honda 600RR Cage : SAME
Honda 900RR Cage : SAME
Honda 954 Cage : SAME
Honda F4/F4i Cage : SAME
Honda F2-F3 Cage : SAME
KAWASAKI :03-04 Kawasaki 636 Cage : 219.99 USD
05-06 Kawasaki 636 Cage : SAME
00-02 Kawasaki Zx6 Cage : SAME
SUZUKI :
96-00 Suzuki Gsxr 600/750 Cage / Also fits 97-99 Gsxr 750 : 219.99 USD
01-03 Suzuki Gsxr 600 Cage / Also fits 00-03 750 : SAME
04-05 Suzuki Gsxr 600/750 Cage : SAME
06-07 Suzuki Gsxr 600/750 Cage : SAME
05-06 Suzuki Gsxr 1000 Cage : SAME
YAMAHA :
99-02 Yamaha R6 Cage : 219.99 USD
03-05 Yamaha R6 Cage : SAME
12 O CLOCK BARS :
HONDA :
99-00 Honda F4i 12 Bar - Black : 99.99 USD
01-02 Honda F4i 12 Bar - Black : SAME
93-99 Honda 900RR 12 Bar - Black : SAME
Honda 954 12 Bar - Black : SAME
Honda 929 12 Bar - Black : SAME
03-04 Honda 600RR 12 Bar - Black : 124.99 USD
KAWASAKI :
03-04 Kawasaki 636 12 Bar - Black : 99.99 USD
05-06 Kawasaki 636 12 Bar - Black : 99.99 USD
05-06 AC Farias 636 12 Bar - Black : 124.99 USD
OTHER PRODUCTS U CAN FIND : www.sickinnovations.com
2. POWERS STUNT WORKS :
CRASH CAGES :
PRICES :
299.00 + $34.00 (around)


OTHER PRODUCTS U CAN FIND : www.powersstuntworx.com
STUNT SPROCKETS :
gearing info :
What is Pitch?
Pitch is quite simply the thickness of the chain and sprockets. 520/525/530 520 being the thinnest and 530 being the thickest. 520 has the advantage of being lighter weight and increasing performance just from the loss of rotating mass. However, the thinner profile does have a shorter life expectancy than a thicker 525 or 530. Likewise, 530 provides a stronger, longer life expectancy but can increase rotating mass. Generally 600’s will use 520 or 525 while 1000’s will use 530.
Where do I start?
We recommend anybody looking to run larger sprockets starts with the back. Down -1 tooth in the front is roughly equal to +3 in the back. Also, anytime more than one or two teeth are added in the back a new chain will be required to fit. For this reason it is generally easier to start gearing with the back. Pick a rear sprocket and chain that will fit your riding style. As you progress or decide to change your gearing it is much easier to change the front sprocket to accommodate. This eliminates the need for new costly rear sprockets and chains. (Ex. Adding +3 to the gearing can be accomplished for $15 with a -1 front sprocket vs. a +3 rear sprocket and new chain.)
What gearing is right for me?
+5 – Provides a good place to start for anybody looking to get a little more into the stunts without sacrificing street riding or too much top speed. Will gain some torque/acceleration while losing roughly 10% of top speed.
+10 - Provides good amounts of power for slower wheelies while still having decent street riding. Will gain good torque/acceleration while losing roughly 20% of top speed.
+15 – Provides great power for technical slow wheelies. Street riding will be reduced to moderation in the city limits. No highways. Will gain great torque/acceleration while losing roughly 30% of top speed.
+20 - Provides huge power for anything and everything technical. Street riding will be reduced to just parking lots. Not for beginners. Will gain huge torque/acceleration while losing roughly 40% of top speed.
+25 or bigger – Ridiculous… but fun. Go big.
Handbrake kits : (must be radial cilinder)
www.magura.com
www.fullthrottleinc.net
also u can buy and other cages / stunt parts (other brands) :
www.freestyleingenuity.com
www.racing905.com
www.tygersharkcages.com
And OMR subcage! (The best stunt sub cages).

Stunt bike set up (for beginners) - Juca - 01-17-2009

OMR SUBCAGES available:
Honda
- CBR F4i - 01, 02, 03 <<< click here, will also fit the single seat style with minor mods
- CBR 954- all years
- CBR 929- all years <<< click here
- CBR 600RR - 03 , 04 , 05 , 06 , 07 , 08 <<< click here
- GSXR 600/750 -00, 01, 02, 03, 04, 05<<<click here
- GSXR 1000 -01, 02, 03, 04
- R6 - 03, 04, 05 <<< click here
- R6s (old body style) - 06, 07, 08
Tech
- The 03-06 CBR 600RR , 03-05 Yamaha R6 ,03 04 gsxr 1000 and the f4i pegs are lowered and moved back and out for better peg position!
- The 01-03 GSXR 600 and 750 have the pegs moved out two inches because of the big tail section
- THE 07 600RR pegs are located 2-1/2 inches lower and 3 inches wider (Than stock)
- All other omr subframe cage models are in the stock location except they are rotated on their axis so they don't fold up unless you fold them up, this also puts your foot on the grippy part of the peg during a wheelie.
- omr subcages are available for all makes and models but only the ones listed above are available for shipping


click here to contact >> old man roger
The original folding peg subcage!
>>click here to see why i only sell folding peg subcages<<
Don't ride on this :

And don't wait till this happens!

Get one of these instead!

Below is a picture that explains why i only sell folding peg subcages
if you look close you can see that the tabs were ripped right off this subframe and that is what can happen if the pegs on your subcage are solid ...folding pegs are the way to go.

Stunt bike set up (for beginners) - Juca - 01-17-2009
TYGERSHARK CAGES PICS :
1. standard

2. apex predator :

3. cj-3

Bikes with tgs cages :


www.tygersharkcages.com
Stunt bike set up (for beginners) - Juca - 01-17-2009
USEFULL LINKS :
www.haibikeshop.com- Bike shop (here u can find all stunt parts).
www.vortexracing.com - Sprockets and chains.
www.thrustcompany.com -Sprockets and chains.
www.hoheydesigns.com - Here you can find dual caliper brackets.
About dual caliper bracket :
OEM style dual caliper brackets used for off road motorcycle freestyle “stunt riding”. Machined out of aircraft grade weld able 6061 aluminum, not cheap quality by far. Don’t bother welding two cast aluminum brackets together because if you know anything about cast aluminum it’s cheap and not very weld able as far as strength or safety. Not reliable. You will need a 75” brake line if your running MX (dirt bike style) handlebars or at least a 66” brake line if you have stock clip on’s. Brackets are designs to operate using bike specific rear calipers. Note, on certain model motorcycles such as the 05-07 model 636’s we recommend using a 80” line if you have MX bars. We recommend that you measure the distance from your hand brake master cylinder to the very back edge of your swingarm to be certain of line length. These brackets are precisionaly machined and will easily last a lifetime.

Stunt bike set up (for beginners) - Juca - 01-17-2009
SOMETHING ABOUT BRAKE FLUID :
The function of brake fluid is to provide an incompressible medium to transmit the driver’s foot pressure on the brake pedal through the master cylinder(s) to the calipers in order to clamp the friction material against the discs. The foot pressure is multiplied by the mechanical pedal ratio and the hydraulic ratio of the master cylinders, booster (if used) and caliper piston(s).
This is a simple concept. When fresh, all brake fluids are virtually incompressible and the system works as well as its mechanical and hydraulic design allows. There are, however significant problems. Overheated brake fluid can (and will) boil in the caliper. Boiling produces gas bubbles within any boiling fluid. Gas is compressible so boiling brake fluid leads to a “soft” brake pedal with long travel. In extreme cases overheated brake fluid necessitates “pumping the brake pedal” in order to get a pedal at all.
You must change stock brake fluid,and buy some brake fluid with high boiling point!
Brembo Racing - LCF 600+ Brake Fluid :
Brembo LCF 600+ has been specifically formulated to provide the highest performance under all racing conditions. It has an independently proven low compressibility at high temperatures.This fluid is used by the world’s best including Moto GP teams Ducati and Honda and Formula 1 team Ferrari amongst many other world and national teams.
Compared to other leading brake fluids (AP600 and CastrolSRF) the Brembo Fluid is designed to give more than:
- 10% reduction in compressibility at 180’C.
- Highest dry boiling point at 316’C (601’F).
- Wet boiling point at 204’C (399’F).
- Brembo LCF600+ is compatible with other high performance DOT 3 and DOT 4 racing brake fluids.
- 500ml bottle.

Pressure bleeding do's and don'ts :
Pressure bleeding on its own is not necessarily a bad thing, but there are several steps one must take to ensure that the bleed event will result in an air-free brake system.
When we talk about pressure bleeding, we are referring to the process in which we pour our brake fluid into a pressure vessel, hook up a pressure source, and run the now pressurized fluid directly into the master cylinder reservoir. One by one the caliper bleeder screws are opened to allow the pressurized fluid to flow through the system until all of the old fluid has been purged. Simple, right?
Well yes, but beware of imitations – not all pressure bleeders are created equal. The professional units (the type you can consider using) separate the pressurized brake fluid from the pressure source (air) using a flexible rubber diaphragm. In this fashion, the pressurized air is kept from forcing its way into the fluid. As we all know, air and fluid should be kept as far apart as possible.
This brings us to the imitations. There seem to be a rash of products available lately that claim to be pressure brake bleeders at a fraction of the cost of the professional units. Like most things that sound too good to be true, well, it’s exactly that.
Like the professional units, these imitations contain a pressure vessel into which new brake fluid is poured. However, in order to pressurize the fluid, an integral pump handle is cycled to build the pressure inside the vessel without any measures taken to separate the pressurized air from the fluid. For those of you who have ever bought a $19.95 do-it-yourself potted plant and bug sprayer from Home Depot you get the idea.
Of course, having pressurized air in contact with the brake fluid will certainly force the fluid through the system just as effectively as the high-zoot professional unit, but as an added bonus we are stuffing air into the brake fluid at the same time. Talk about an unwanted surprise!
While it may not be visible to the naked eye (air can actually entrain itself in the fluid as to be visually undetectable) it’s there right along with all of the nasty moisture trapped inside of it. This of course begs the question: if you are stuffing air and water contaminated fluid into your brake system, why even bother bleeding it in the first place?
Naturally there will be those who argue that the amount of air in question is not important enough to worry about, but think about this for a moment: nearly every automotive manufacturer stores their bulk brake fluid in large containers which are subjected to a constant VACUUM. Talk about an expensive process! If just storing your fluid under regular atmospheric conditions isn’t good enough to keep air and water out, just imagine what shoving 30psi worth of compressed air on top of it is doing.
Brake fluids (boiling points) :
Fluid name , Dry point (first number) , Wet boiling point (second number) :
AP SUPER 600 : Dry boiling point (590 F) - Wet (410 F)
CASTROL SRF : 590 F - 518 F
NEO SUPER DOT 610 : 610 F - 421 F
MOTUL RACING 600 : 593 F - 420 F
MOTUL DOT 5.1 : 509 F - 365 F
ATE SUPER BLUE : 536 F - 392 F
VALVOLINE : 503 F - 343 F
SYNPOWER : 503 F - 329 F
ATE SL : 500 F - 311 F
CASTROL LMA : 450 F - 288 F
AP 551 : 528 F - 374 F
Stunt bike set up (for beginners) - Juca - 01-17-2009
HANDLE BAR CONVERSATION :
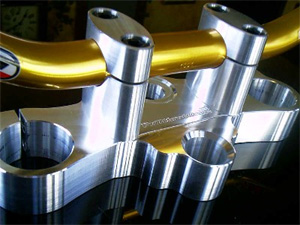
1. You need new triple clamp.
2. U can get longer lines (handbrake line and clutc) sure you can use old lines.
Ttiple clamps :
DB handlebars :
RENTHAL :

RENTHAL DB SIZE CHART : http://www.motorcycle-superstore.com...IZE-CHART.ASPX

TAG METALS HANDLE BARS :


MOOSE :


Handlebar info :

Stunt bike set up (for beginners) - Juca - 01-17-2009
ACERBIS HEADLIGHTS :
Blitz :

Forge new trails with the revolutionary Blitz headlight! Incredible design, functionality and aerodynamics fused by Acerbis� R&D department equate to a product without compromise.
� Stacked headlight design in state of art
� Dual 35W halogen lamps for great illumination
� Central heat-resistant unit accepts bulbs up to 50W
� 10� Pencil and 38� Flood
� Will fit virtually any motorcycle
Availble in:
CR Red, YZ Blue, Black, Green, KTM Orange and Yellow.
DHH :

Dual 12 volt, 35 watt, tungsten halogen bulbs
50mm diameter glass lenses with high-gloss reflectors
Pencil beam directs the light straight out with a 10� arc
Flood beam directs the light closer to the bike over a 38� arc
Diamond :
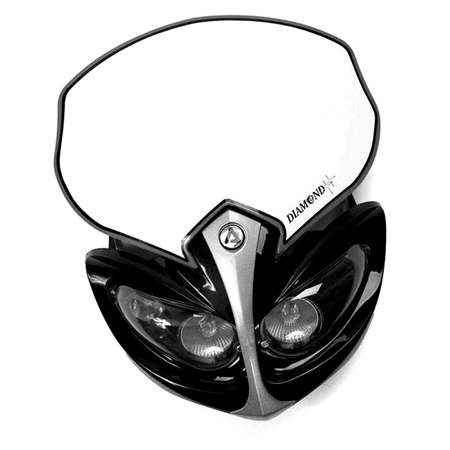
The Acerbis Diamond headlight represents a revolution in headlight design. The Diamond was the first headlight to include two halogen bulbs in an aftermarket headlight and now it has three! The Diamond is equipped with polycarbonate lenses and a polypropylene number plate above the headlight. This headlight can be adapted to fit a wide range of dirt bikes and some street bikes.
� Mounts with two plastic brackets and four rubber straps
� Fits virtually any motorcycle
� Two center bulbs are 36� floods and the third bulb is the 10� pencil, giving a broad field of illumination.
Cyclope :
Nylon surround
Polypropylene nuberplate
Polycarbonate reflector
Cast aluminium headlight body and tempered glass lens.
TUV certified. DOT,ECE and SAE approved.
Ajustable angle.
Universal fitting with anti-vibration rubber strips.
Removable number plate
Available in a wide variety of colours.Protective, transparent polycarbonate lens cover supplied for off -road use.Heat resistant plastic headlight support.Wiring accessories provided.lLow beam fitted with 55w halogen bulb, low beam /side light fitted with 55w halogen bulb and 5w incandescent bulb.
Stunt bike set up (for beginners) - Juca - 01-17-2009
EASY PULL CLUTCH LEVERS :
MSR PRO RAPTOR :

Adjustable cable feature let you choose from 3 positions according to your clutch pull preferance and riding style.
The top position gives you increased cable pull; The middle position is the same as a standard lever assembly; the bottom position provides an easy pull (325% less effort)
The cable adjuster is an anodized pivoting regulator that is easy to adjust and eliminates cable drag in all 3 positions
PRICE : 47.00 USD
MOOSE E-Z PULL :

A simple two-position pulley allows the clutch to have an extremely easy pull.
PRICE : 43.89 USD
FTP E-Z PULL :

FTP easy pull clutch levers have been designed with 3 different settings that allows you to adjust the feeling of your clutch to suit your personal needs (Hard to Soft)
PRICE : 65.00 USD
Stunt bike set up (for beginners) - Juca - 01-17-2009
SICKINNOVATIONS NEW BAR :
It is a base that always stays on the bike and has interchangeable plates between round bar and flat. You can also buy just a replacement loop or flat bar if you ever wear them out. Nuts are welded to the back so all you need is an allen wrench and a few seconds to swap them out or just remove it and pop your taillight in for street killin.


www.sickinnovations.com
Stunt bike set up (for beginners) - Juca - 01-17-2009
SICK INNOVATIONS STREET CAGE.
Comes with aluminum sliders.
Remember this isnt a full stunt cage so dont expect it to hold up like one.


